
Since iOS 7, you could open Control Center and quickly access important device settings. Since then, Control Center had evolved, adding quick access to more device features, keeping you from having to close the app you’re in and search through Settings. Here’s a guide to everything you can do with Control Center on your iPhone and iPad and how to customize it to make it work for you.
Most importantly, how do you access Control Center? Well, if you have an iPhone with a home button, swipe up from the bottom of your screen. If you don’t have a home button or have an iPad, swipe down from the top right of your screen. Once in Control Center, you have a whole host of controls.
First, let’s look at the network controls, which is the first box to the left. In the outer section, you can toggle Airplane Mode, Cellular Data, WiFi, and Bluetooth. On devices that don’t have cellular service, like your iPad or iPod Touch, you will see AirDrop instead of cellular data. One thing to note, tapping on the WiFi or Bluetooth in Control Center will not turn those services off. Instead, the WiFi toggle will temporarily disconnect you from your current WiFi network, and the Bluetooth button will temporarily unpair you from all of your Bluetooth devices. Any temporarily disconnected services will have a white background, enabled services will have a blue background, and disabled services will have a black background.

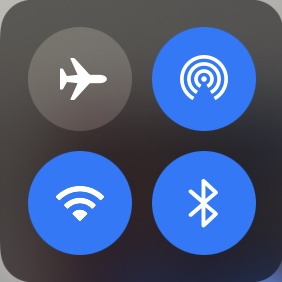
When you long-press on that box, you will get an expanded list of options, including AirDrop and Personal Hotspot. Behind every button, here are more options. If you long-press on AirDrop, you can limit who can AirDrop things to you, whether only people in your contacts, everyone, or turn the service off. Long-pressing on WiFi will list all of the WiFi networks in your area that you can connect to, and If you’re looking for advanced WiFi settings, you can tap the Wi-Fi Settings button, which will take you to the WIFI section in Settings. The same kind of thing happens when you long-press on Bluetooth, you get a list of Bluetooth devices. Then, if you need to add a new device, you can tap the Bluetooth settings button to quickly jump into the Bluetooth section in settings.
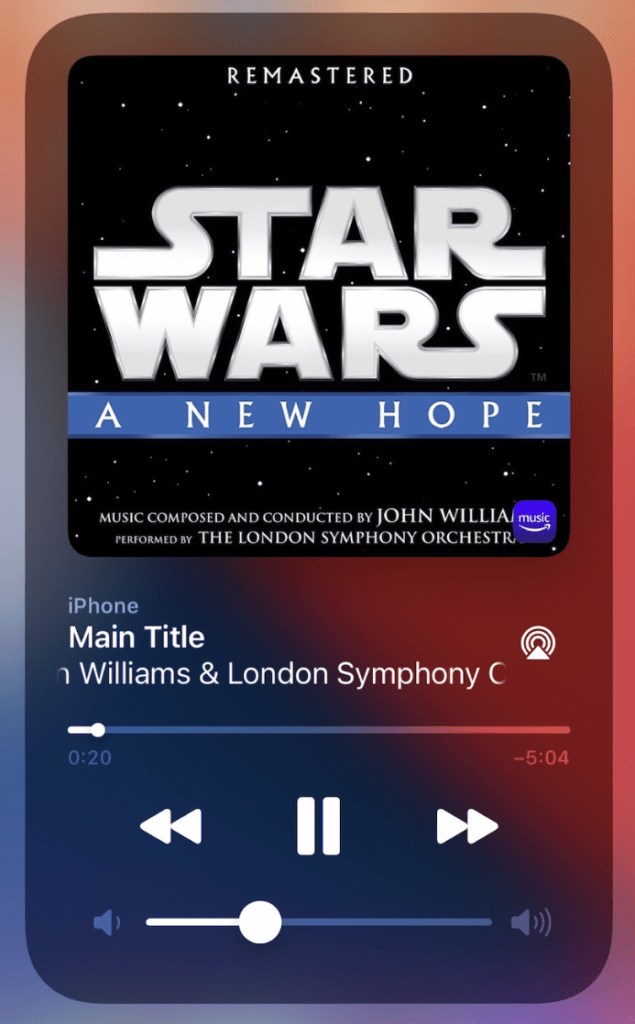
Moving on to the next square, you find your audio controls. Here, you can control the playback of videos, podcasts, music, and any other multimedia content. On the surface of the audio controls, you can see the title, the name of the content creator, and a thumbnail of the album artwork. You also get limited audio controls in the form of play/pause and skip buttons. In the top corner is the AirPlay controls, but more on that later.
Long pressing on the playback controls gives you more options. The album artwork is front and center and links you to the app the content is playing from. Under the artwork is the title and name of the content creator. Below that is the scrubber, where you can skim between different points in the track. You can also play/pause, skip, and control the volume. In some cases, like playing music from a radio station, you will see different playback controls, such as a like button.
Now, let’s reverse a bit and take a look at AirPlay. When you click on the AirPlay button, you’re shown a list of AirPlay-compatible TVs and speakers along with paired Bluetooth speakers and headphones, including with your Beats and AirPods. Clicking on one of these devices will send your content to that device, but you will still have full playback controls from your iPhone or iPad. Some devices may even have extra features. For instance, some battery-powered headphones and speakers may show you their current battery percentage. Or, Apple-made headphones, like the AirPods or Beats, let you share your audio with other pair Apple wireless headphones. Lastly, at the bottom, you can tap “Control Other Speakers & TVs” to control the playback of your AppleTVs or HomePods. Clicking one of those devices will give you the same playback controls as something playing natively on your iPhone or iPad.
Let’s move to the next block of settings. The rotation lock will keep your screen from rotating when your spin your device around. Next to it is Do Not Disturb, which will silence incoming calls and notifications. Long pressing the control, you can choose how long you want Do Not Disturb to be enabled, whether for an hour, until the next day, until you leave your current location, or put Do Not Disturb on a schedule in Settings. When iOS 15 is released in the fall, you will be able to create custom presets to configure which notifications you get. For instance, you can create a work preset that only shows you work-related notifications. Or, create a home preset that only shows you notifications you want to see while you’re at home. You can then set the preset to automatically enable based on your current location or during a certain time frame. Stay tuned for a future video on the updates coming to Do Not Disturb in iOS 15.
Below those two settings is Screen Mirroring. So, if you have an AppleTV, AirPlay-compatible SmartTV, or a Mac running macOS Monterey or later, you can use them as an external display for your iPhone or iPad. Just click screen mirroring and choose the device from the list.
Moving to the right, you have your brightness controls. You can use the slider to adjust your screen’s brightness or long-press for more display options. At the bottom of the long-press settings, you can toggle True Tone, Night Shift, and Dark Mode. Here a quick run-through of each of those. True Tone improves color accuracy by adapting your screen’s color based on your room’s lighting. Night Shift turns off or limits blue light illuminating from your screen. And, dark mode switches your device to a dark color theme. You can also configure these in the Display and Brightness section in Settings.

Next to the display controls is the volume control, which you can easily adjust from the front screen. Normally, there is an icon of a speaker over the audio controls. But, if you’re using headphones, you will see an icon of those instead. For instance, when I pair my Beats Flex, I see a Beats Flex icon. You will notice the same thing if you have a pair of AirPods. Long pressing the volume controls will expand the audio slider. However, if you have advanced headphones, like a pair of AirPods Pro, you will see headphone-specific features such as noise cancellation presets.
The next block are your smart home accessories from the Home app. Long pressing on devices will give you more options specific to that device, and long-pressing on Favorites will show you all of your devices.
Now we are at the point where you can start customizing your Control Center. So, if you open Settings then go into Control Center, you can choose which controls appear and change their order. For instance, if you don’t have any smart accessories in the Apple Home app, flip the switch to hide that block. Scrolling down, you will find optional settings you can add to your Control Center. Clicking the green plus will add a control, red minus to remove, and use the three horizontal lines to rearrange their order. You can continue opening Control Center to preview your changes as you make adjustments. Also, be sure to long-press on each of the controls you add to learn of its hidden features. For instance, long-pressing on the flashlight lets you control the brightness, and holding down the timer lets you start a timer without having to leave Control Center.
For my Control Center, I have the following controls: Flashlight, Timer, Calculator, Camera, Screen Recording, Wallet, Apple TV Remote, and Music Recognition.
Behind most controls in Control Center are hidden features waiting to be explored, and keep you from leaving the app you’re in just to set a five-minute timer, change your brightness, skip a song, turn on your flashlight, and so much more. So, personalize it and make it work for you!
Subscribe: Apple Podcasts | Google Podcasts | Spotify | Amazon Music | Android | Pandora | Blubrry | Email | TuneIn | RSS | More