
Personalizing the appearance on your Mac can make it more accustomed to your style is great. With any version of macOS, you have been able to change your desktop image.
To change your desktop open “System Preferences” by clicking on the Apple menu on the top left of your display then click on “System Preferences” in the menu that appears.
Now that the System Preferences is open, in the first category, or row click on “Desktop & Screen Saver”. At the top of the preference pane are tabs for “Desktop” and “Screen Saver”. Make sure that you are on the “Desktop” tab.
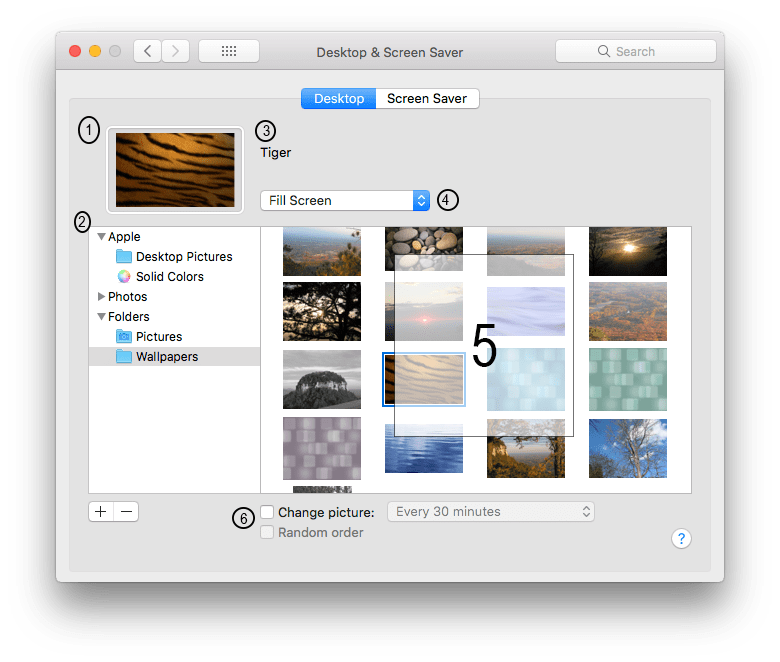
Key:
①: Preview
②: Sources
③: Image Name
④: Format Image
⑤: Images
⑥: Slideshow Image
To change your desktop image choose one from list ⑤. To change the folder refer to the left sidebar for other sources ②. Under the “Apple” dropdown are default pre-installed Apple desktop images and solid colors that you can customize. Under that dropdown is “Photos” where you can find all of the images that are saved in your Photos library. The last drop-down option is “Folders”. Under this group, you can add or remove a custom folder with images by clicking the plus (+) to add a folder or minus (-) to remove a folder from the list. Once you click on your source of choice choose your image from the list to the benefit. Above the source sidebar and image, the list is a preview ① to see how the image will look on your desktop. To change the scale of your desktop click the dropdown ④ and choose from one of the options.
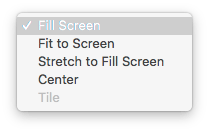
“Fill Screen” will zoom in enough to fill the screen with your image without stretching or distorting. “Fit to Screen” will center the image without zooming, distorting, or stretching, a colored border will surround the image. You can change the color by clicking the colored box that will appear next to the menu. “Stretch to Fill Screen” stretches the whole image to fit the screen. “Center” centers the image in the middle of the screen with a border surrounding it. The final option in the menu is “Tile” which stacks the image across the screen.
Next to the preview is the title or file name ③ of the image. At the bottom of the pane is a toggle to rotate images, like a slide show, By clicking the drop-down you can change how often the images will rotate, then underneath that toggle is another checkbox that will randomize the order of the images.
Helpful Links: